How to Install a Car Pet Barrier Without Tools or Stress
Traveling with pets can be a wonderful experience, but it also comes with safety considerations. A car pet barrier is an effective way to keep your pet safely in the back seat or cargo area, preventing distractions and enhancing road safety. The best part? Many models are designed for easy, tool-free installation—no stress, no hassle.
Why You Need a Car Pet Barrier
A car pet barrier prevents your furry friend from jumping into the front seat or moving around freely while the car is in motion. This minimizes distractions and ensures a safer drive. It also provides your pet with a designated, secure space, which can reduce anxiety and help them settle during travel. Beyond safety, a barrier helps preserve your car’s interior by minimizing the risk of scratches, shedding, or mess from muddy paws.
What to Look for in a Car Pet Barrier
Not all barriers are created equal, so it’s essential to pick one that fits your needs and vehicle type. Here’s what to consider:
- Compatibility: Ensure it fits your car’s dimensions—especially between the front seats.
- Material: Durable fabrics like Oxford cloth and claw-proof mesh offer longevity and resilience.
- Visibility: Mesh panels allow you and your pet to see each other, which is comforting for both.
- Ventilation: Breathable material promotes airflow to keep your pet cool and comfortable.
- Ease of Installation: Look for a model that requires no tools or technical skills to set up.
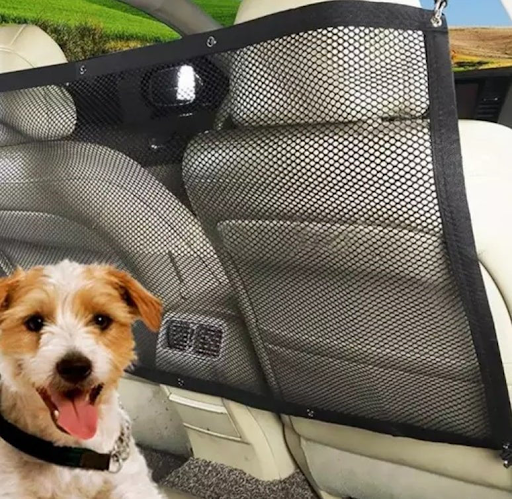
A great example is the Universal Car Pet and Child Isolation Barrier from Bold Car. Made from heavy-duty 600D Oxford cloth and mesh, it’s designed to withstand claws, provide visibility, and install easily with adjustable elastic straps.
How to Install a Car Pet Barrier Without Tools
Here’s a step-by-step guide to installing a car pet barrier quickly and effectively—no tools required:
1. Unbox and Inspect
Open the package and check for all necessary components. Make sure the barrier isn’t damaged and that all straps and buckles are included.
2. Position the Barrier
Place the barrier between the two front seats. Align the mesh center with your rearview line so you can see your pet and they can see you.
3. Secure the Upper Straps
Loop the top elastic straps around the front seat headrests. Adjust them so the barrier sits taut and evenly between the seats.
4. Fasten the Lower Straps
Attach the bottom straps to the lower seat frames or other secure anchor points. Tighten the straps to prevent the barrier from shifting during the ride.
5. Check and Adjust
Once installed, press lightly against the barrier to ensure it’s secure. Make final adjustments to the straps as needed to maintain a snug fit.
The entire setup process typically takes just a few minutes—ideal for busy pet owners who want a simple, effective solution.
Pro Tips for Smooth Installation
- Follow Manufacturer Instructions: Always check the included guide for any model-specific steps.
- Check for Movement: Ensure the barrier is tight and doesn’t wobble—this helps it stay effective over time.
- Introduce the Barrier to Your Pet: Let your pet get familiar with the new setup before driving to reduce anxiety.
- Do Regular Inspections: Over time, check the straps and fabric for wear and tear, especially if your pet is very active.
Don’t Forget the Car Floor Mats
While a car pet barrier protects your driving experience and your pet, don’t overlook the importance of maintaining your vehicle’s interior. High-quality car floor mats can catch fur, dirt, and debris, especially if your pet sheds or comes in from outdoor adventures. Mats also make clean-up easier and preserve the value of your car in the long run.
Conclusion
Installing a car pet barrier is one of the simplest ways to travel safely and comfortably with your pet—especially when it doesn’t require any tools or complex steps. The Universal Car Pet and Child Isolation Barrier from Bold Car is an excellent choice for a no-fuss, durable solution. Pair it with reliable car floor mats to keep your vehicle clean, organized, and road-trip ready.