How To Create An Embroidery Designs?
Start Your Embroidery Journey
Starting your embroidery journey is fun and exciting. Embroidery is a craft where you use a needle and thread to make pictures and patterns on fabric. It is like drawing with thread. At first, try simple designs like basic shapes or your favorite letter. Choose a plain shirt or pillowcase to practice on. Take your time to learn basic stitches, such as the running stitch and satin stitch, so you can create clear lines.
Use a pencil to draw your design on paper before you start. This helps you plan your work well. Each project, even small ones, teaches you new skills. It is okay to make mistakes because every error helps you learn and get better. Enjoy each step and be proud of your progress. With practice, you will create beautiful art and discover the joy of embroidery. Happy stitching and have fun starting your embroidery journey!
1. Plan Your Design Idea
The first step is to have a clear idea. Think about what you want to make. Do you want to design a flower, a cute animal, or a fun shape? Write down your idea or draw a rough sketch on a piece of paper. A simple plan helps you know what to do next. Remember, a good design starts with a clear idea and a simple sketch.
Ask yourself:
- What shapes do I like?
- Which colors will look best?
- Where will I place the design on the fabric?
Planning your design helps you decide the size and style. When you have your idea, you are ready to move on to drawing.
2. Draw Your Design
Now that you have your idea, it is time to draw your design. Use a pencil and paper to create a simple and clear drawing. Make sure your lines are bold and easy to see. A simple drawing works best because it makes the next steps easier.
Keep these tips in mind:
- Draw simple shapes.
- Use clear, bold lines.
- Erase any mistakes so your drawing looks neat.
Your drawing is like a map for your embroidery machine. It shows where every line and shape should go. When your drawing is ready, you are set for the next step: digitizing your design.
3. Digitize Your Artwork
Digitizing means turning your drawing into a digital file that an embroidery machine can read. This step is very important because the machine needs a clear file to follow. You can use special computer programs to trace your drawing and create the file.
Here is what to do:
- Scan Your Drawing: Use a scanner or take a clear picture of your drawing. Make sure the image is bright and not blurry.
- Open the File on Your Computer: Use a program that helps you convert the drawing into a digital design.
- Trace the Drawing: Carefully trace over your drawing in the computer program. This creates a digital file with your design.
- Save the Digital File: Save your file in a format that your embroidery machine can use.
If you find digitizing hard, you can ask for help from embroidery digitizing services USA. These experts turn your drawing into a perfect digital file. This digital file will be used by your machine to create your embroidery design.
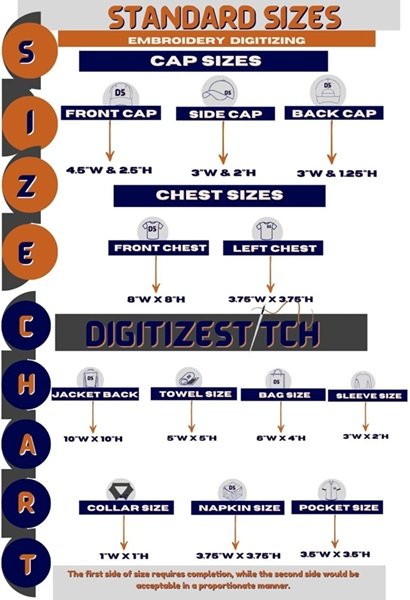
4. Use An Embroidery Size Chart
An embroidery size chart is a very useful tool. It tells you the best size for your design on different items, like T-shirts, hats, or bags. When your design is the right size, it looks neat and balanced on the fabric.
Here is how you use an embroidery size chart:
- Check the Chart: Look at the chart to see recommended measurements.
- Compare Your Design: Adjust your digital design if needed so that it matches the measurements on the chart.
- Ensure Good Fit: A well-sized design is easy to see and makes your project look professional.
Using an embroidery size chart helps you create machine embroidery designs that fit perfectly. It ensures that your design is not too big or too small. This step is important for a neat and attractive final product.
5. Choose Your Colors And Threads
Colors bring your design to life. When you pick colors for your embroidery design, choose bright and clear colors that stand out on the fabric. You can use a few strong colors instead of many different shades. This makes your design look clean and easy to see.
The type of thread you use is also important:
- Cotton Threads: They give a soft look.
- Polyester Threads: They can be shiny and strong.
- Mix and Match: Try different threads to see which looks best with your design.
When you choose the right colors and threads, your embroidery design becomes even more beautiful. This is another step that makes your project special.
6. Test Your Design On A Sample
Before stitching your design on the final fabric, it is a good idea to test it on a small sample. Testing helps you see if the design looks as you planned and if the stitching order is correct.
Steps to test your design:
- Choose a Small Fabric: Use a piece of fabric like your final project.
- Load Your Digital File: Put the digital file into your embroidery machine.
- Stitch a Test Design: Let the machine stitch your design on the sample.
- Check the Result: Look at the test design to see if all parts are clear and in the right order.
If something is not right, go back to your digital file and adjust it. Testing is a helpful step to make sure your machine embroidery designs turn out well.
7. Get Help From Embroidery Digitizing Services USA
Not everyone finds it easy to digitize their designs. If you are having trouble or want your design to be perfect, you can ask for help from embroidery digitizing services USA. These experts are skilled in turning your drawing into a digital file that is just right for the embroidery machine.
Why useembroidery digitizing services USA?
- Expert Help: They know how to fix any problems in your design.
- Save Time: They help you finish the digitizing step faster.
- Professional Quality: Your final digital file will be neat and clear.
When you use their services, you can be sure that your machine embroidery designs will look as good as you imagined them.
8. Stitch Your Design On Fabric
Once everything is ready, it is time to stitch your design onto the fabric. Follow these steps:
- Prepare Your Fabric: Make sure the fabric is clean and smooth.
- Place Your Design: Position your digital design on the fabric in the correct spot.
- Load the Design: Put your digital file into the embroidery machine.
- Start Stitching: Let the machine do its work, following the digital file.
Watch as your design comes to life on the fabric! This is the exciting part where your hard work turns into a beautiful embroidered piece.
9. Practice And Learn New Ideas
The more you practice, the better you will get at creating embroidery designs. Try making different designs and testing new techniques. Look at other machine embroidery designs to get ideas. Practice helps you learn what works best and improves your skills over time.
Here are some ideas to keep learning:
- Join a Club: Find a group of friends who like embroidery.
- Watch Videos: Look for online tutorials that explain new methods.
- Share Your Work: Show your designs to family and friends for feedback.
- Keep a Journal: Write down your ideas and what you learn with each project.
Practice makes you more confident and helps you create even more beautiful embroidery designs in the future.
10. Organize Your Tools And Files
Keeping your workspace neat helps you work faster and better. Make sure you have all your tools in one place. Organize your digital files by creating folders on your computer for each project. This will help you find your designs quickly when you need to make changes or start a new project.
Tips for organization:
- Clean Workspace: Keep your desk tidy.
- Label Files: Name your digital files clearly.
- Store Tools: Keep your pencils, markers, scanner, and computer in a designated spot.
A well-organized workspace makes your embroidery journey smoother and more enjoyable.
11. Enjoy The Process Of Creating
Most importantly, have fun with your embroidery projects. Enjoy every step, from planning and drawing to digitizing and stitching. Each project is a chance to learn and create something special. Your creativity makes your work unique, and every design you complete will make you more skilled.
When you enjoy the process, your love for art shows in your embroidery designs. Celebrate every success, and do not worry if things are not perfect at first. With time and practice, your designs will become even more beautiful.